Showing posts with label fibre_preparation. Show all posts

Friday, 27 May 2016

Just add an Electricarder...

I wrote this recently for my friends at Electricarder and thought I would share with my readers also.  I hope you find it useful. :-)

Ashford Wild Carder with Electricarder Review
The Ashford Wild Carder is a little power horse for something more glamorous than standard carding.  Whilst only 4” wide, it has been designed with extra long teeth to allow your batts to be bulked up with various fibre, ribbons, feathers and other embellishments.  Because it has a medium carding cloth (72 point) you can still use it to card ‘straight’ fibre which is often a good starting point before creating blends.

As I produce my own fibre, I need to process it to a point before creating any blends or funky art yarns.  At this stage, my wild carder is my only carder so it has to be a work horse for all sorts.  Alpaca fleece will process quickly as it is smooth compared to wool.  Processing wool is a bit slower as the fibres grab together making work for the wild carder a little harder and works your arm cranking the handle.

To lighten my load, the people at Electricarder have built a motor fitted for the Wild Carder.  This is a real productivity boost.  Not only do you card a little faster but you can card more continuously.  

What do I mean by carding continuously?  
You are spreading, stretching, fluffing the fibre up as the carder steadily takes in what you have already placed on the input tray.  There is no need to stop, prepare, load then crank the handle.
Recently I spent a few hours in the shed preparing some Corriedale batts.  They weren’t too chunky/bumpy this time around and the Electricarder motor allowed me to work at about double the pace.

I started with 50grams each of red, blue, lime green and deep green Corriedale fibre.  It had been washed and carded but had been compacted after being in storage for a few years.  The dying and drying process fluffed it up a bit then the next step was to turn it into batts.

Unfortunately I had a camera malfunction so we only have the finished product photos as the work in progress photos were lost when the SD card became corrupted.  The pics below are just under slightly different lighting.  But I digress.

I first carded each colour individually then laid them out and matched up the add-ins.


Each 50 grams made three not too tightly packed batts.  Once I decided what I would add in I split the original batts into three and mixed them up.  This was done to even out the colour.  The red and blue were combined as I was looking for a purple but with the red and blue elements still visible.
Each thinned batt was then stretched width way and length way and spread out on my working table.
Then I loaded up the extras onto each thinned batt.  A little silk, a little more, a little Mohair, and a little more... you get the idea.  Spread these out evenly along the batt, then stack them back together to create one giant sandwich of fluff and colours.  This is then stretched out again and split length ways, then stretched length ways.  You are wanting to stretch it so you can nearly see through the fibre.  This gives you the best consistency.

At this point I turn on the Electricarder motor and begin to feed in the fibre sandwich.  Now depending on how much room you have in you work space (mine is tiny) you can split the batt even further.  But you can do this while the Electricarder keeps working.  There is no stopping and starting to prepare then crank the handle then prepare and crank the handle, you keep preparing and lining up the fibre.  Tidy it up and ensure it is being taken in evenly between the guides then stretch out some more fibre ready to go.  You can take the batts off and put them through again but I like to keep some of the character of the add ins.

I find about half speed on the Electicarder dial gives me good pace and good quality.  If you find the drive band starts slipping you may have overloaded it a little.  Thin out your input and see how that goes.  As mentioned earlier, different fibre will perform differently so have a play and adjust your technique to suit.

Happy Carding J

Saturday, 5 March 2016

Blending Boards

Well it has been a while since my last post on fibre preparation tools.  Stuff happens in our lives and I just had to shelve my blogging for a while.  Hopefully I am back on track.

As I mentioned some time ago, I would do a post on blending boards.  Now, I don't own a blending board nor have even used a blending board.  So, I definitely don't speak with authority on them.  However, I have read a lot on them and regularly look them up on the internet.  I am always amazed by the talent of fibre people when working with some of these tools.

There are many companies who make blending boards.  Ashford, Louet, Majacraft, Clemes & Clemes are only a few brands on the market.  Then of course if you can source carding cloth you could make your own if you are skilled in those sort of things.

Essentially it is a board with carding cloth affixed.

Now that doesn't sound too spectacular but the results can be spectacular.  Check out the Ashford YouTube clip (https://www.youtube.com/watch?v=_FenT3pshrU), Fibrehappy's clip with her homemade blending board (https://www.youtube.com/watch?v=wbEKcZk_XZo) or Clemes & Clemes (https://www.youtube.com/watch?v=RlmqzEUNMxE).  Or just pop "blending boards" into your favourite search engine or in the YouTube search bar and you will get a heap of options to look at.  (I have watched most of them.)

You will notice that as with many spinning and fibre preparation tools, everyone has their own style and little techniques that work for them.  Please take this as a message that there is no single right way to prepare fibre.  Some ways are better than others but over time you adjust your methods to the results you are targeting.

You shouldn't go past looking at some of the clips about spinning from rolags as these are what you end up with on a blending board.

Why would you want to buy a blending board?
I can only comment on my reasons.  Feel free to add your own reasons in the comments.
  • ability to create customised blends
  • ability to blend various fibres
  • ability to card and blend larger amounts than on hand cards.
  • it looks like a little less work on your shoulders.
I hope this has helped you in a small way if you are interested in blending boards.  One is still on my wish list but it may be a while away as I have a lot of fibre to get washed and dyed.

Happy spinning. :-)


Friday, 18 December 2015

Wool Pickers

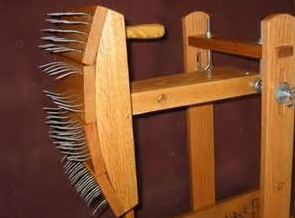
My swing picker (looks much like this one) is my other medieval torture tool.  Seriously just look at those tines!!


There are box pickers and swing pickers.  There are a few manufacturers and also DIY versions on the internet.

With DIY instructions in hand I originally asked a carpenter friend of mine if he would make one for me.  Even he looked wide eyed at all those long stainless steel nails (in the picture) and responded, “you have got to be kidding”.  Well no, I wasn’t kidding, and no, he wasn’t willing to risk injury in his backyard workshop making such a dangerous looking implement. 
So, off to the internet I went again to look for an affordable one.  Eventually I found a lovely lady who was needing to downsize her fibre hoard and fibre implements so a near new one found a new home from her garage to my wool shed.  And I then had a swing picker.
Why did I think I needed a swing picker?
Well firstly it is a bit hard to ‘try before you buy’ many of these tools as they are few and far between.  I hear that many guilds have a selection of tool to try and borrow but as I wasn’t a member of a guild I didn’t have that luxury.  Given I was now processing whole fleeces I thought a wool picker would come in handy.

Do’s and Don’ts of wool picking
  • Do use with sufficient clearance between you and anything else.
  • Sit back from your wool picker (you don’t want your jumper or t-shirt getting picked!)
  • Do understand the ideal set up of your implement.  The spacing of the tines for the type of fleece you are picking is important.  Some implements should always be adjusted with the tines slightly apart, while some are built to interlock the tines slightly as they are offset.
  • Do wash your wool before picking.  Alpaca doesn’t need to be washed first as it has no sticky lanolin.
  • Do sweep it out VERY CAREFULLY and thoroughly after each use. 
  • Don't use out in the open unless it is a breezeless day.  Your fluff will blow away.
  • Don't push your fingers too far into the area where the tines are.  (Hopefully this one doesn't need more explaining!)
  • Don't use near small children or inquisitive pets.
  • Don't overload it.  More is not better and getting too much fibre jammed between the tines makes for a dangerous exercise to sort it out.
What to do with your picked fibre?
  • You can spin from the cloud without further processing.
  • Use this ‘fluff’ to card or even comb into roving.
  • You can dye your fluff but be careful not to agitate it or it will turn into felt.
  • You can use your picker to begin the blending process with different coloured fibres.
The benefits of a wool picker?
  • It quickly gets rid of small amounts of VM.
  • It fluffs up your fibre.
  • It can help you begin to blend large amounts of fibre.

What have I learnt about my picker?
It is one of many tools in my arsenal of fibery things.  I really like to process alpaca fibre through the picker as it is the quickest and easiest way to get the VM out.  Feel free to pop your fibre through more than once. 
Useful links
https://spidersworkshop.wordpress.com/2012/03/23/building-a-wool-picker/

 
Happy Spinning :-)


Thursday, 5 November 2015

Wool combs


Valkyrie Wool Combs...

Wolverine without the side burns!!!!  Well not quite, but perhaps reminiscent of some sort of medieval torture tool.  These things can be dangerous so make sure your tetanus shots are up to date.

Learning to use these requires careful attention, primarily so as not to stab ones self and draw blood.  And mind you this is VERY easy to do.  But the end result is beautiful roving.

I find the main benefits of using wool combs is to strip out VM and second cuts.  Many people, as you will find if you start looking through YouTube clips, will use combs with a hackle.  I don't have a hackle yet but you can use them with or without a hackle.

I found this wonderful image and at the same time discovered another spinners blog, Barbro's Threads.  I hope you don't mind me using your pic, but in the process I have added you to one of my fav blogs.  So much history and wonderful information.  But I digress...

You can see in this picture, not only the sharp tines of the combs, but the fluffy results achieved.

Another spinner, and just overall handy girl extraordinaire is Rexi R.  My kids love her videos even though they are not yet fully addicted to spinning.   Whilst she is demoing Indigo Hound Combs they are much the same thing and Rexi R brings spinning instructional videos to life.  If you have even the slightest lop sided sense of humour you too will smile at her helpful, practical and amusing videos.  Yay Rexi R.

I watched many videos on using a comb and hackle but since I don’t have a hackle I was struggling to get my technique right if I didn’t attach one of my combs to a work bench.  Then I found this video by Susan McFarland.  Susan shows us how to use the combs safely without having to attach them to a bench.  This is a great video on using hand combs.

Combing is currently my favourite technique.  Well perhaps the technique is not the favourite but the result certainly is.

Yes it takes time, but the results are oh so soft.  You can create little fluffy bumps to spin from or to dye or blend.  And once you get your groove happening it is surprising how fast you can comb a well washed fleece.   I have heard it said that combing is faster than carding.  I suppose that comment is relative to the  size of your carder, but noting blend through a card nicer than well combed fleece. 

It is good to have a variety of fibre processing techniques.  Variety of movement helps ensure you don’t suffer from muscle or joint overuse.  More on the health and safety aspects of spinning in a later post.  You can do a bit of combing, do a bit of dying then blend it on your hand cards or carding machine for another effect altogether.  The possibilities are endless.

Back to combing.  There is probably not much more I can add if you watch the two videos that I have linked in.  These ladies have nailed the technique.

However, a word of advice.  You will find combing much easier if your fleece is well washed.  I have tried combing unwashed fleece and it just turns into a clumpy sticky mess.  My sheep all seem to have a reasonably high lanolin content which is where the stickiness comes from.  You can comb raw alpaca quite successfully as alpaca does not have lanolin.  The same would probably apply to other hair type fibres.  Also, don't overload your combs at least until you get the hang of it.

So that's all on wool combs.  Like everything there are many different brands.  but you may find that only a few brands are available in your country.

Monday, 19 October 2015

Hand Cards

Before I launch into today’s blog, I want to thanks all those wonderful people who put in the time to make YouTube videos.  I use them to learn more about spinning techniques, new knitting or crochet stitches, even how to trim the toenails on my sheep.  Whilst sometimes I wish for a less technology based world I would never find enough resources in my local libraries to supplement my search for woolly learning.  Thank you internet and thank you YouTube’rs.  ;-)

I also love promoting other spinners web sites.  One of the first ones of real value that I found (and all you others don’t think your site is no value, I may have just not found you at the time), is Tulasi Zimmer’s site “The Joy of Handspinning” (http://joyofhandspinning.com/).  Tulasi has a wonderful way of explaining things in the most simple terms and with just the right number of pictures to assist.  Her explanation on how to roll rolags was the only one that made sense to me and I finally got the hang of it.  (And Angora rabbits are definitely part of my retirement plan ;-)

Here is a link to her page on hand carding.  Check it out. 

There are many brands and types of hand cards on the market.  I just happen to have Ashford ones but nearly all the wheel manufacturers also make hand cards.  Essentially hand cards are a flat or curved paddle with carding cloth attached.  It is possible to make your own hand cards if you have skills in that area, although I have found it a little challenging to source carding cloth in Australia.


Teachers and experienced spinners may tell you that there are carders for various purposes.  The downside is that when you are starting out you may not be able to buy tools for all occasions and really when you are starting out there is no need to.  (Remember there are no spinning police here.)

You can card most anything on a basic set of hand cards but be flexible with the results if you are trying this with specialties.  Fibres like cotton card better on finer carding cloth, as does angora (rabbit), ox, possum, silk roving, milk silk and various other fine fibres.  That’s not to say it can’t be done, just the results are a little less smooth the further apart the tines on the cloth are.

I only have one set of hand cards and they do everything for me.

My assumptions about hand cards?

I overloaded them at first.  The more you put on the quicker you are going to be able to process this fleece right? WRONG!! You just end up with a matted mess and lots of neps if you load too much on the hand cards.  (Neps are those little balls of fibre.  Sort of like pills in a finished fabric.)

Load just enough to not clearly be able to see the tines.  Most people find it better to use washed wool.  Trying to process unwashed wool will leave your hand cards sticky with lanolin and over time they get grubby so that when you want to process something fine or expensive you need to overhaul your hand cards back to a presentable state (and that may not be easy).  I’m not saying it can’t be done but most spinners will advise against using hand cards for unwashed wool.  Or at least if that is what you want to do, have a second set just for the nice clean fibre.

I also thought that I would get smooth roving from my hand cards.  Well I haven’t yet.  If I start with roving and am blending it, then yes the results are nice, aligned and smooth.  Processing a washed fleece does not get the same results.  Although I haven’t yet tried cutting the tips of the wool off yet.  (yes this is suggested by some!)

Perhaps my results are a little less than what I expected as I didn’t really understand these tools when I first got them.  But I think we all learn best from trial and error.  My hand carding is slowly getting better as I observe more of what I am doing and learn to adjust my technique to observe different results.

But what do I use my hand cards for?

I initially thought I could use them in the house by my wheel in place of the Wild Carder.  Well the results there were yes and no.

Rule 1 of spinning in my house.... ALWAYS have an old sheet or table cloth under your work area.  Even mill washed roving deposits dust and debris under where you are working.  At least with some sort of covering over the floor you can take it outside and give it a shake between having to vacuum after every spinning session.

So I carded to make rolags.  I blended to make coloured rolags.  I used my hand cards to prepare small samples of fibre or colour blends.  I came to the conclusion that my hand cards are a tool with their own purpose.  They don’t replace my carding machine, my flicker brush or hand combs. 

Some spinners appear to do most their processing on hand cards.  But I am looking for variety in technique and from a health and safety view that is also good.  Hand cards are a different action to carding machines, combs and flickers.  And, variety of action is good for us.  

A handy tip... If you ever go to a show to buy fleece, pop your hand cards in your bag.  I find being able to card a few locks of a fleece will give you a better idea of how it will handle when you take it home to spin it.

So where to now?

With spinning being an ancient craft, developed in different ways, and with different fibres around the globe there is much information to be found and much to be learnt.  In this modern technical age we can and should learn much about our chosen craft.  I have included an extra link to the Ashford clip on hand carding, but time and a suitable internet data allowance will allow you to find many many more resources.

I know Wikipedia often gets a bad rap for being unreliable but their page on Carding is pretty informative for those of you who like a little history and technical info, to supplement the practical “how to” type info.  The post covers all sorts of carding and has some informative links at the bottom if you would like to read further.

So experiment and spin happy.

Sunday, 11 October 2015

My Wild Carder

So moving along my spinning preparation journey and the need to gather many fibre toys, I thought I needed a Wild Carder.

The specs and sales pitch straight from the Ashford web site...

Make unique blends for art yarn
- adjustable packer brush
- extra long 72ppsi teeth
- adjustable drum clearance
- lacquered and assembled
- cleaning brush, clamps and awl included
- cards up to 40gm fibre

The Wild carder has been specifically designed for today’s fabulous, fun and funky art yarns. The extra long 72ppsi teeth allow you to include differing fibres, fabric, ribbons, feathers, paper and novelties to create unique blends. The packer brush is adjustable and will control fine, low-crimp fibres and increase the size of the batt. The drum clearance is also adjustable which allows you to set the teeth distance for total control of your fibre.
All nylon bearings ensure it is light and easy to turn. The card cloth has wire teeth with a special protective coating and a flexible rubber backing for long life.
The doffer and cleaning brush are stored on the carder. The carder is strong but lightweight with hand hold for easy carrying. The carder has rubber feet to prevent it slipping. It comes assembled and lacquered ready to use
.
http://www.ashford.co.nz/newsite/carders/75/carding/wild-carder/moredetail.html

Honestly, the Ashford Wild Carder is a great little tool.  To see what it can do just have a look at this YouTube clip by Ashford.  https://www.youtube.com/watch?v=bB32vVuh7xs

When I started spinning, whilst I was processing some raw Corriedale with my dog comb, I also was buying processed roving.  I wanted to dye and blend different fibres and play with all the different textures I could in my learning.  The only problem in doing this is that I was constantly spinning lots of different fibres lots of different ways so may have taken longer than I should have to perfect certain techniques.  But hey, this journey is meant to be a fun one and for someone that is sometimes bordering on obsessive tendencies the freedom I was learning was somewhat liberating.

So back to why I bought a Wild Carder.  I could so see myself blending all manner of fibres into colourful batts and spinning them into wonderful yarns.  And I did plenty of this.  The wild carder became my go to tool.  I bought lots of clean smooth roving and started mixing.  I bought silk; I cut up ribbons; I cut up bits of mill yarn with interesting textures; I blended and coloured.  Whilst I stuck to the script of what the Wild Carder was to be used for (see the specs above) I got great results.

Then I bought my sheep and started trying to process my fibre into roving with not so great results.  It took me a while to figure out that a carder, wild or otherwise, was not going to get small amounts of VM (vegetable matter) out of my washed fleece.  And those grubby tips that sometimes stay grubby after you have washed them stayed grubby even after I carded them.  <sad face>

So I needed other tools.  Or did I need to go back to basics and figure out how to process wool from the very beginning.  After playing with my flicker brush or comb then putting this through my carder I got a much better result.  This was highlighted even more when I partnered up with the people from ElectriCarder to test out their motor for the Wild Carder.  (www.electricarder.com)

I worked the little motor hard.  And then it dawned on me in very practical ways the difference between wool from a sheep and fibre from an alpaca.  (We might discuss different fibre types in the future.)  I could process half an alpaca fleece in very little time through the Wild Carder with an ElectriCarder motor fitted.  The batts were smooth and tons of VM fell out in the process.  In no time I had lots of bumps of alpaca fibre ready to spin.

Wool on the other hand was hard going.  I had the belt slipping, the grubby bits on the tips of the wool were still there, I could only process small amounts at a time before the drum stopped turning.  I returned to the Ashford videos for revision and thinned my fibre input to something resembling cobwebs.

Realisation slowly dawned on me that...

A CLEAN FLEECE + HAND COMBS = WELL PREPARED FIBRE

WELL PREPARED FIBRE + A WILD CARDER = VERY NICELY BLENDED BATTS

Now the hand combs can be replaced by the flicker brush or the comb, but in essence you need reasonably well prepared fibre to start your blending journey with your Wild Carder.  The old adage, "garbage in garbage out" is so true.  You will frequently hear that a well prepared fibre will spin better.  A poorly prepared fibre will take longer to spin as you pick out neps and bits of VM you didn't get out in the preparation process.

Now my batts look something like those in the Ashford video so I am pleased.

But, I continue to chase fibre tools that will make my life easier or just bring a different dimension to my fibre processing and ultimately my spinning.

Until next time, happy spinning.

Sunday, 4 October 2015

Dog Combs and Flickers


DOG COMBS

Yep you read right, dog combs. 

When I first bought my wheel I had raw Corriedale fibre and was flicking the tips with a dog comb.  Lock by lock I combed the edges on my trusty piece of black vinyl.  I would comb a few then spin a few.  It was slow work but I knew no better and it was a reasonable result.  I could practise dying with spun wool or individual locks.  I must say, I was pleased with my first skein of lumpy, bumpy, colourful yarn.  I had nicely prepared fibre and spun up something that I could crochet from.  I actually think my spinning was better than my crocheting!!

I had no assumptions as I knew no better.  I was simply enjoying the process and learning the feel of the fibre and how a well combed lock responded verses a no so well combed lock.  I wasn’t inhibited with trying to spin woollen or worsted.  Some I combed the tip then base and spun from the base.  Some I combed the base then tip and spun from the tip.  There were no spinning police just my desire to get better.  Was this right or wrong?  I didn’t really care.  There are plenty of years in my spinning life ahead to settle on puritan ways if I so choose.

I think this was a good learning base as in some respects things got easier as I began to move onto other tools.

FLICK CARDER

A year or two after buying my wheel and still considering myself very much a beginner, I took a spinning class.  Most there, were still learning how to spin a continuous length of yarn.  I had already mastered that but knew there was still much to learn.  Unfortunately, I had Grumpy Teacher who told us there were three types of Alpacas (Huacaya, Suri and Alpaca!) and not so politely (well I felt at least) asked “so what do you expect to achieve out of coming to a beginner class?” :-P I was there to learn.  Whatever there was to learn!  As it turned out I improved my spinning.  I got a taste of a few different fibres, bought a Flick Carder and learnt how to use it.

Again I had no assumptions about the flick carder as I had spent the last while combing all my raw wool with a dog comb or spinning nice smooth roving that I had since discovered on that horrible (haha) site called eBay.

 The flick carder allowed me to prepare fibre much quicker and I think the end result was a little better, although that seemed to depend on the fibre.
 
One piece of advice.... have a sheet of black vinyl or a wooden board on your lap.  A flicker will do significant damage to your clothes over time.

One of my favourite sites I first stumbled across when looking for resources was ‘The Joy of Handspinning’.  Lots of great information on many aspects of spinning and the fibre arts.  Here is a link to one of their instructional videos on the flick carder.


 WHICH ONE IS BEST?

They both serve a purpose and if you experiment you may settle on a favourite.  A few years down the track on my spinning journey I do find the comb is sometimes better for longer and coarser wool/fibres.  If I want to spin Suri from the lock then the comb is the preferred tool for me.  If I want to spin my Merino or Boarder Leicester in the grease then the flicker will get me through enough fibre in a day to keep me spinning at night for the week.

 If you have the opportunity to try both, do so.  Of course you can buy a dog comb at most any discount store or of course pet store.  A flick carder is a specialist spinning tool so you will have to go on eBay or to a spinning supply web site or store.

At some point I will post a supplier guide of all the places I know where you can buy spinning gear from.  Of course you all have the internet (otherwise you wouldn’t be reading this) and can search away.  But, sometimes they are a little tricky to find.  So anyway, I will post something one day to help you on your way.


Happy Spinning until next time.